Saturday, March 23, 2024

Bridging Snowflake and Azure Data Stack: A Step-by-Step Guide

In today's era of hybrid data ecosystems, organizations often find themselves straddling multiple data platforms for optimal performance and functionality. If your organization utilizes both Snowflake and Microsoft data stack, you might encounter the need to seamlessly transfer data from Snowflake Data Warehouse to Azure Lakehouse. 

Fear not! This blog post will walk you through the detailed step-by-step process of achieving this data integration seamlessly.

As an example, the below Fig:1 shows a Customer table in the Snowflake Data warehouse.


Fig 1: Customer data in the Snowflake data warehouse

To get this data from Snowflake to Azure Data Lakehouse we can use cloud ETL tool like Azure Data Factory (ADF), Azure Synapse Analytics or Microsoft Fabric. For this blog post, I have used Azure Synapse Analytics to extract the data from Snowflakes. There are two main activities involved from Azure Synapse Analytics:

A. Creating Linked Service

B. Creating a data pipeline with Copy activity


Activity A: Creating Linked service

In the Azure Synapse Analytics ETL tool you need to create a Linked Service (LS), this makes sure connectivity between Snowflake and Azure Synapse Analytics.

Please find the steps to create Linked Service:

Step 1) Azure Synapse got built in connector for Snowflake, Please click new Linked service and search the connector "Snowflake" and click next as shown in Fig 2 below

Fig 2: Built in connector Snowflake

Step 2) Make sure to fill all the necessary information

Fig 3: Linked service details


a) Linked service name: Please put the name of the Linked service

b) Linked service description: Provide the description of the Linked service.

c) Integration runtime: Integration runtime is required for Linked service, Integration Runtime (IR) is the compute infrastructure used by Azure Data Factory and Azure Synapse pipelines. You will find more information under Microsoft learn page.

d) Account name: This is the full name of your Snowflake account, to find this information in Snowflake you need to go to Admin->Accounts and find out the LOCATOR as shown in figure 4.

Fig 4: Snowflake account name

If you hover over the LOCATOR information, you will find the URL as shown in fig 5.

Fig 5: Snowflake account URL

Please don't use full URL for the Account name in Linked Service, keep until https://hj46643.canada-central.azure

e) Database: Please find the database name from Snowflake, go to Databases->{choose the right Database} as shown in Fig 6

Fig 6: Snowflake Database

Snowflake database is nothing but storage. In general ,MS SQL Database, ORACLE or Teradata have their compute and storage together and called Database. However, in Snowflake; Storage is called Database and Compute is their Virtual data warehouse.


f) Warehouse: In Snowflake, you have warehouse in addition to the database. Please go to Admin->Warehouses->{choose your warehouse} as shown in fig 7. We have used the warehouse: AZUREFABRICDEMO


Fig 7: Virtual Warehouse in Snowflake


g) User name: User name of your Snowflake account

h) Password: Password of your Snowflake account

i) Role: Default role is PUBLIC, if you don't use any other role it will pick PUBLIC. I did not put any specific role so kept this field empty.

j) Test connection: Now you can test the connection before you save it. 

k) Apply: If the earlier step "Test connection" is successful, please save the Linked service by clicking apply button. 
                                                                  

B. Creating a data pipeline with Copy activity

This activity includes connecting the source Snowflake and copying the data to the destination Azure data Lakehouse. The activity includes following steps:

1. Synapse Data pipeline 

2. Source side of the Copy activity needs to connect with the Snowflake

3. Sink side of the Copy activity needs to connect with the Azure Data Lakehouse


1. Synapse Data pipeline

From the Azure Synapse Analytics, create a pipeline as shown Fig 8

Fig 8: Create a pipeline from Azure Synapse Analytics


And then drag and drop Copy activity from the canvas as shown in Fig 9, You will find Copy activity got source and sink side.

Fig 9: Copy Activity


2. Source side of the Copy activity needs to connect with the Snowflake

Source side of the Copy activity needs to connect with the Snowflake Linked service that we created under the Activity A: Creating Linked service. Please find how you connect Snowflake from Synapse pipeline, at first choose "Source" and then click "New" as shown in below fig 10

fig 10: Source dataset (step 1)

and next step is to choose Snowflake as shown in below fig 11


Fig 11: Source dataset with Snowflake


After choosing the above integration dataset, you will find another UI which you need to fill up as shown in fig 12

Fig 12: Source dataset details


a) Name: Provide a dataset name
b) Linked service: Please choose the Linked service which we already created under the Activity A
c) Connect via Integration runtime: Choose the very same Integration runtime you used at the Activity A.
d) Table name: Now you should able to find all the table from Snowflake, so choose the right table you want to get data from.
e) Click 'Ok' to complete the source dataset.

3. Sink side of the Copy activity needs to connect with the Azure Data Lakehouse

Now we need to connect the sink side of the copy activity, fig 13 shows how to start with sink dataset.

Fig 13: creating sink dataset

And then fill up the details to create Sink dataset as shown in the below fig 14

fig 14: Sink dataset properties


a) Name: Provide a dataset name
b) Linked service: Please choose the Linked service which we already created under the Activity A
c) Connect via Integration runtime: Choose the very same Integration runtime you used at the Activity A.
d) File Path: Now you need to choose the file path in Azure Data Storage account. I have already created a storage account, container and sub directory. The file path is: snowflake/testdata
e) Click 'Ok' to complete the source dataset.

The Synapse pipeline is completed. However, before executing the pipeline, need to check if there is any error in the code. To check it, please click 'validate'. When I did the validation found the below error as shown in fig 15


Fig 15: staging error
The error is self explanatory, since we are copying directly from Snowflake data warehouse, we must need to enable staging in the pipeline. 

To enable staging, at first click on settings of the pipeline, then enable the staging and connect a Linked service that connect a storage as shown in the below fig 16. 
Fig 16: Enable staging in the Copy pipeline


When you are connecting the blob storage for the staging please make sure it's not ADLS storage account and must need to choose Authentication type SAS URI.

After fixing the error when execute it again, the pipeline moved the data from Snowflake data warehouse to Azure data lake storge. You will find a .parquet file created as shown below fig 17

and you can view the data by using notebook as shown in fig 18. 

fig 18: Data from Azure Data Lake 


The blog post shared how you can copy data from Snowflake Data warehouse to Azure Data Lake by using Azure Synapse Analytics. The same can be achieved through Azure Data Factory (ADF) as well as Microsoft Fabric.


Wednesday, November 29, 2023

How to solve available workspace capacity exceeded error (Livy session) in Azure Synapse Analytics?

Livy session errors in Azure Synapse with Notebook

If you are working with Notebook in Azure Synapse Analytics and multiple people are using the same Spark cluster at the same time then chances are high that you have seen any of these below errors: 

"Livy Session has failed. Session state: error code: AVAILBLE_WORKSPACE_CAPACITY_EXCEEDED.You job requested 24 vcores . However, the workspace only has 2 vcores availble out of quota of 50 vcores for node size family [MemoryOptmized]."

"Failed to create Livy session for executing notebook. Error: Your pool's capacity (3200 vcores) exceeds your workspace's total vcore quota (50 vcores). Try reducing the pool capacity or increasing your workspace's vcore quota. HTTP status code: 400."

"InvalidHttpRequestToLivy: Your Spark job requested 56 vcores. However, the workspace has a 50 core limit. Try reducing the numbers of vcores requested or increasing your vcore quota. Quota can be increased using Azure Support request"
The below figure:1 shows one of the error while running the Synapse notebook.

Fig 1: Error Available workspace exceed

What is Livy?

Your initial thought will likely be, "What exactly is this Livy session?"! Apache Livy is a service that enables easy interaction with a Spark cluster over a REST interface [1]. Whenever we execute a notebook from Azure Synapse Analytics Livy helps interact with Spark engine.


Will it fix if you increase vCores?

By looking at the error message you may attempt to increase the vCores; however, increasing the vCores will not solve your problem. 

Let's look into how Spark pool works, by definition of Spark pool; when Spark pool instantiated it's create a Spark instance that process the data. Spark instances are created when you connect to a Spark pool, create a session and run the job. And multiple users may have access to a single Spark pool. When multiple users are running a job at the same time then it may happen that the first job already used most vCores so the another job executed by other user will find the Livy session error . 

How to solve it?

The problem occurs when multiple people work on same Spark pool or same user running more than one Synapse notebook in parallel. When multiple Data Engineer works on same Spark pool in Synapse they can configure the session and save into their DevOps branch. Let's look into it step by step:

1. You will find configuration button (a gear icon) as below fig 1 shown:
Fig 2: configuration button

By clicking on the configuration button you will find details about Spark pool configuration details as shown in the below diagram:
Fig 3: Session details
And this is your session, as you find in the above Fig 3. And there is no active session. 

2. Activate your session by attaching the Spark pool and assigning right resources. Please find the below fig 4 and details steps to avoid the Livy session error.

Fig 4: Fine-tune the Settings

a) Attach the Spark pool from available pools (if you have more than one). I got only one Spark pool.
b) Select session size, I have chosen small by clicking the 'Use' button
c) Enable Dynamically allocate executor, this will help Spark engine to allocate the executor dynamically.
d) You can change Executors, e.g. by default small session size have 47 executors however; I have chosen 3 to 18 executors to free up the rest for other users. Sometimes you may need to get down to 1 to 3 executors to avoid the errors.
e) And finally apply the changes to your session.

And you can commit this changes to your DevOps branch for the particular notebook you are working on so that you don't need to apply the same settings again.

In addition, since the maximum Synapse workspace's total vCores is 50, you can create request to Microsoft to increase the vCores for your organization.

In summary, the Livy session error is a common error when multiple data engineers working in the same Spark pool. So it's important to understand how you can have your session setup correctly so that more than one session can be executed at the same time.


Saturday, July 1, 2023

Provisioning Microsoft Fabric: A Step-by-Step Guide for Your Organization

Learn how to provision Microsoft Fabric with ease! Unveiled at Microsoft Build 2023, Microsoft Fabric is a cutting-edge Data Intelligence platform that has taken the industry by storm. This blog post will cover a simple step-by-step guide to provisioning Microsoft Fabric using the efficient Microsoft Fabric Capacity.

Before we look into the Fabric Capacity, let's get into different licensing models. There are three different types of licenses you can choose from to start working with Microsoft Fabric:
1. Microsoft Fabric trial
It's free for two months and you need to use your organization email. Personal email doesn't work. Please find how you can activate your free trial
2. Power BI Premium Per Capacity (P SKUs)
If you already have a Power BI premium license you can work with Microsoft Fabric. 
3. Microsoft Fabric Capacity (F SKUs)
With your organizational Azure subscription, you can create Microsoft Fabric capacity. You will find more details about Microsoft Fabric licenses
We will go through the steps in detail on how Microsoft Fabric capacity can be provisioned from Azure Portal.

Step 1: Please login to the Azure Portal and find Microsoft Fabric from your organization's Azure Portal as shown below in Fig 1.
Fig 1: Finding Microsoft Fabric in Azure Portal

Step 2: To create the Fabric capacity, the very first step is to create a resource group as shown in Fig 2


Fig 2: Creating resource group

Step 3: To create the right capacity you need to choose the resource size that you require. e.g. I have chosen F8 as shown in the below figure 3

Fig 3: Choose the right resource size


You will find more capacity details in this Microsft blog post.

Step 4: As shown below in Fig 4, before creating the capacity please review all the information you have provided including resource group, region, capacity size, etc., and then hit the create button. 

Fig 4: Review and create


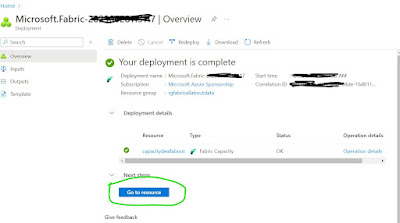
When it's done you will able to see Microsoft Fabric Capacity is created (see below fig 5)

Fig 5: Microsoft Fabric capacity created

You can go to the admin portal to validate your recently created Fabric capacity too. Fig 6, shows the Fabric capacity under the admin panel.

Fig 6: Fabric capacity under admin portal


To explore the Microsoft Fabric please browse through the site and you will find the capacity you just created finally and the home page will look like below in Fig 7

Fig 7: Fabric Home page


In summary, you have a few ways to use Microsoft Fabric and learned provisioning Fabric by using Fabric Capacity. However, it's important to remember you must need to Enable Microsoft Fabric for your organization.


Wednesday, May 24, 2023

What is OneLake in Microsoft Fabric?

Get ready to be blown away! The highly anticipated Microsoft Build 2023 has finally unveiled its latest and greatest creation: the incredible Microsoft Fabric - an unparalleled Data Intelligence platform that is guaranteed to revolutionize the tech world!


fig 1: OneLake for all Data

One of the most exciting things in Fabric I found is OneLake. I was amazed to discover how OneLake is simplified just like OneDrive! It's a single unified logical SaaS data lake for the whole organization (no data silos). Over the past couple of months, I've had the incredible opportunity to engage with the product team and dive into the private preview of Microsoft Fabric. I'm sharing my learning through the Private Preview via this blog post, emphasizing that it is not an exhaustive list of what OneLake encompasses.


I got OneLake installed on my PC and can easily access the data in the OneLake like OneDrive as shown in Fig 2:


Fig 2: OneLake is like OneDrive on a PC


Single unified Managed and Governed SaaS Data Lake 

All Fabric items keep their data in OneLake so no data silos. OneLake is fully compatible with Azure Data Lake Storage Gen 2 at the API layer which means it can be accessible as ADLS Gen 2.

Let's investigate some of the benefits of OneLake:

Fig 3: Unified management and governance
  • OneLake comes automatically provisioned with every Microsoft Fabric tenant with no infrastructure to manage.

  • Any data in OneLake works with out-of-the-box governance such as data linage, data protection, certification, catalog integration, etc. Please note that this feature is not part of the public preview.

  • OneLake enables distributed ownership. Different workspaces allow different parts of the organization to work independently while still contributing to the same data lake
  • Each workspace can have its own administrator, access control, region, and capacity for billing

Do you have requirements that data must reside in those countries?

Fig 4: OneLake covers data residency

Yes, your requirement is covered through OneLake. If you're concerned about how to effectively manage data across multiple countries while meeting local data residency requirements, fear not - OneLake has got you covered! With its global span, OneLake enables you to create different workspaces in different regions, ensuring that any data stored in those workspaces also reside in their respective countries. Built on top of the mighty Azure Data Lake Store gen2, OneLake is a powerhouse solution that can leverage multiple storage accounts across different regions, while virtualizing them into one seamless, logical lake. So go ahead and take the plunge - OneLake is ready to help you navigate the global data landscape with ease and confidence!


Data Mesh as a Service:


OneLake gives a true data mesh as a service. Business groups can now operate autonomously within a shared data lake, eliminating the need to manage separate storage resources. The implementation of the data mesh pattern has become more streamlined. OneLake enhances this further by introducing domains as a core concept. A business domain can have multiple workspaces, which typically align with specific projects or teams.


Open Data Format

Simply, no matter which item you start with, they will all store their data in OneLake similar to how Word, Excel, and PowerPoint save documents in OneDrive.


You will see files and folders just like you would in a data lake today. All workspaces are going to be folders, each data item will be a folder. Any tabular data will be stored in delta lake format. There are no new proprietary file formats for Microsoft Fabric. Proprietary formats create data silos. Even the data warehouse will natively store its data in Delta Lake parquet format. While Microsoft Fabric data items will standardize on delta parquet for tabular data, OneLake is still a Data Lake built on top of ADLS gen2. It will support any file type, structured or unstructured.


Shortcuts/Data Virtualization


Shortcuts virtualize data across domains and clouds. A shortcut is nothing more than a symbolic link that points from one data location to another. Just like you can create shortcuts in Windows or Linux, the data will appear in the shortcut location as if it were physically there.


fig 5: Shortcuts

As shown in above fig 4, if you have existing data lakes stored in ADLS gen2 or in Amazon S3 buckets. These Lakes can continue to exist and be managed externally by OneLake in Microsoft Fabric.

Shortcuts will help to avoid data movements or duplication. It’s easy to create Shortcuts from Microsoft Fabric as shown in Figure 6:

 Fig 6: Shortcuts from Microsoft Fabric


OneLake Security


In the current preview, data in OneLake is secured at the item or workspace level. A user will either have access or not. Additional engine-specific security can be defined in the T-SQL engine. These security definitions will not apply to other engines. Direct access to the item in the lake can be restricted to only users who are allowed to see all the data for that warehouse. 

In addition, Power BI reports will continue to work against data in OneLake as the analysis services can still leverage the security defined in the T-SQL engine through DirectQuery mode and can sometimes still optimize to DirectLake mode depending on the security defined.


In summary, OneLake is a revolutionary advancement in the data and analytics industry, surpassing my initial expectations. It transforms Data Lakes into user-friendly OneDrive-like folders, providing unprecedented convenience. The delta file format is the optimal choice for Data Engineering workloads. With OneLake, Data Engineers, Data Scientists, BI professionals, and business stakeholders can collaborate more effectively than ever before. To find out more about Microsoft Fabric and OneLake, please visit Microsoft Fabric Document.


Sunday, April 23, 2023

How to solve Azure hosted Integration Runtime (IR) validation error in Synapse Analytics?

This blog post shares recent learning while working with Data flows in Azure Synapse Analytics.

The ETL pipeline was developed using Azure Synapse Data Flows. However, when attempting to merge the code changes made in the feature branch into the main branch of the DevOps code repository, a validation error occurred, as shown below in Figure 1:

Fig 1: Validation error

It is worth noting that the same pipeline was executed in Debug mode, and it ran successfully without encountering any errors, as depicted in Figure 2.:

Fig 2: Successfully run on debug mode


On the one hand, when trying to merge the code into the main branch from the feature branch it throws a validation error, on the other hand, the pipeline executed successfully in the debug mode. It seems a bug and reported it to the Microsoft Synapse team.

The validation error needed to be fixed so that the code can be released to the Production environment. The Azure Integration run time (IR) was used in the Data flows created by using the Canada Central region. However, IR must need to use 'Auto Resolve' as shown in Fig 3. 

Fig 3: Region as 'Auto Resolve'

And used the newly created IR in the pipeline which resolved the issue.

In summary, though your Azure resources can be created under one particular region e.g. all our resources are created under the region Canada Central, but; for Synapse Data Flows activity you need to create Azure IR by choosing Auto Resolve as the region.


Sunday, February 5, 2023

How to implement Continuous integration and delivery (CI/CD) in Azure Data Factory

Continuous Integration and Continuous Deployment (CI/CD) are integral parts of the software development lifecycle. As a Data Engineer/ Data Professional when we build the ETL pipeline using Azure Data Factory (ADF), we need to move our code from a Development environment to Pre-Prod and Production environment. One of the ways to do this is by using Azure DevOps.

Target Audience:

This article will be helpful for below mentioned two types of audiences.

Audience Type 1: Using DevOps code repository in ADF but CI/CD is missing

Audience Typ 2: Using ADF for ETL development but never used DevOps repository and CI/CD

For Audience Type 1 you can follow the rest of the blog to implement CI/CD. And for audience type 2, you need to first connect ADF with the DevOps repository, and to do so please follow this blog post and then follow the rest of this blog post for the CI/CD.

This blog post will describe how to set up CI/CD for ADF. There are two parts to this process one called 1) Continuous Integration (CI) and 2) Continuous Deployment (CD).

1) Continuous Integration (CI)

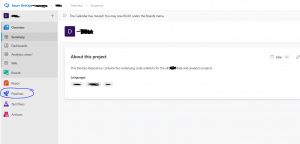
First, you need to log in to the Azure DevOps site from your organization and click the pipelines as shown in fig 1.

Pipeline creation

Fig 1: DevOps pipelines

And then click “New pipeline” as shown in fig 2

New Pipeline

Fig 2: New pipeline creation

And then follow the few steps to create the pipeline:

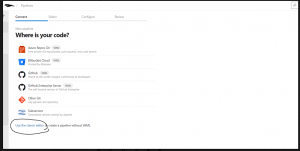
Step 1: Depending on where your code is located, choose the option. In this blog post, we are using the classic editor as shown below in fig 3.

Fig 3: Choose the right source or use the classic editor

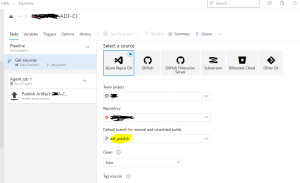
Step 2: In this step, you need to choose the repository that you are using in ADF and make sure to select the default branch. We have chosen ADF_publish as a default branch for the builds.


Fig 4: selecting the branch for the pipeline

Step 3: Create an Empty job by clicking the Empty job as shown in below figure 5

Fig 5: Selected Empty job

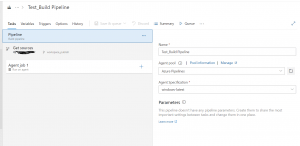
Step 4: You need to provide the agent pool and agent specification at this step. Please choose Azure Pipelines for the agent pool and windows latest for the Agent specification as shown in figure 6.

Fig 6: Agent pool and Agent specification


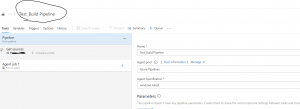
Now click "Save and Queue" to save the build pipeline with the name “Test_Build Pipeline” as shown below figure:

Fig 7: Saved the build pipeline

The build pipeline is completed, and the next part is creating the release pipeline which will do the continuous deployment (CD) means the movement of the code/artifacts from Development to the pre-prod and Production environment.

2) Continous Deployment (CD)

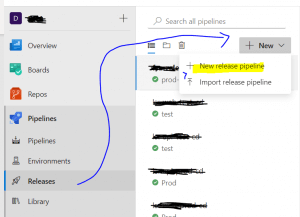
The very first step of Continuous Deployment is to create a new release pipeline. And this release pipeline will have a connection with the previously created build pipeline named "Test_Build Pipeline".


 Fig 8: Release Pipeline

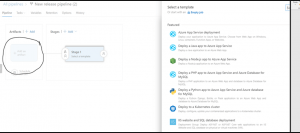
As soon as you hit the new release pipeline following step will appear. Please close the right popup screen and then click +Add on the artifact as shown below figure:


  Fig 9: Create the artifact

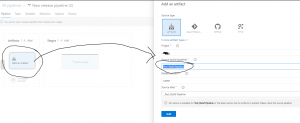
Next step to connect the build pipeline and the release pipeline, you will find out the build pipeline that you created at the CI process earlier and choose the item “Test_Build Pipeline”


Fig 10: connecting the build pipeline from the release pipeline

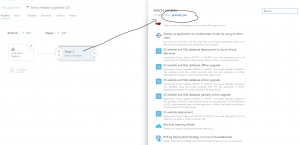
Click on Stage 2 and select an empty job as shown in fig 10

empty job
  Fig 11: Empty job under release pipeline

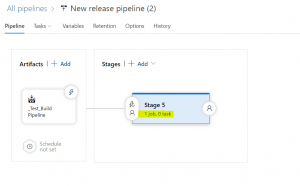
After the last steps the pipeline will look like the below, now please click on 1 job, 0 tasks. We need to create an ARM template deployment task

job and tasks

Fig 12: Release pipeline job and task

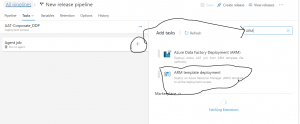
Search for ARM template deployment, as shown in fig 13. ARM template Deployment task will create or update the resources and the artifacts e.g. Linked services, datasets, pipelines, and so on.

search for ARM template
  Fig 13: search for the ARM template

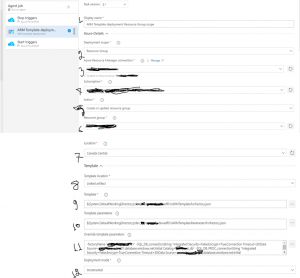
After adding the ARM template, you need to fill in the information for 1 to 12 as shown in the below diagram:

ARM template configuration

Fig 14: ARM Template information

  1. Display Name: Simply put any name to display for the deployment template
  1. Deployment Scope: You have options to choose the deployment scope from Resource Group, Subscription, or Management Group. Please choose Resource Group for ADF CI/CD.
  1. Azure Resouce Manager Connection: This is a service connection; if you already have a service principal you can set up a service connection or create a completely new one. The Cloud Infrastructure team in your organization can set it up for you. You will also find details about Service Connection in Microsoft Learn.
  1. Subscription: Please choose the right subscription where the resource group for the ADF instance resided for the pre-Prod or Production environment.
  1. Action: Please Choose "Create or Update resource group" from the list.
  1. Resource Group: The resource group name where the ADF instance is lying.
  1. Location: Resource location e.g. I have used Canada Central
  1. Template Location: Please choose either "Linked Artifact" or "URL of the file". I have chosen "Linked Artifact" which will connect the ARM template which is already built via Continuous Integration (CI) process.
  1. Template: Please choose the file "ARMTemplateForFactory.json"
  1. Template parameters: Please choose the template parameter file: "ARMTemplateParametersForFactory.json"
  1. OverrideTemplate Parameters: Make sure to overwrite all the parameters including pre-prod or production environment's database server details and so on. Go through all the parameters that exist in the Development environment you need to update those for the upper environments.
  1. Deployment mode: Please choose "Incremental" for the Deployment mode.

After putting all the above information please save it. Hence your release pipeline is completed.

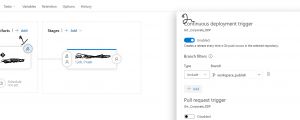
However, to make this pipeline runs automated, means when you push the code from the master to publish branch you need to set up a Continuous deployment trigger as shown in fig 15

release trigger

fig 15: Continuous deployment Trigger


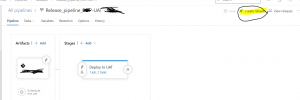
The last step of the CD part is creating a Release from the Release pipeline you just created. To do so please select the Release pipeline and create a release as shown in fig 16. 

Create release

Fig 16: Create a Release from the release pipeline

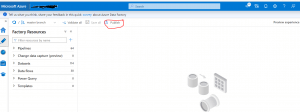
 You are done with CI/CD. Now to test it please go to your ADF instance choose the master branch and then click the 'Publish' button as shown below in figure 17. The C/CD process starts and the codes for pipelines, Linked Services, and Datasets move from the Development environment to Pre-Prod and then to Production.

publish from ADF

Fig 17: Publish from Azure Data Factory (ADF)

The blog post demonstrates step by step process of implementing CI/CD for ADF by using ARM templates. However, in addition to ARM template deployment; there is another ARM template named "Azure Data Factory Deployment (ARM)" which can also be used to implement CI/CD for ADF.